

Comcast DNS has frequently has problems with Nextbigfuture.com
OpenDNS and Google Public DNS both offer free and faster DNS support.
Switching to Google Public DNS is not only more reliable it also makes surfing faster on you android phone, iphone or computer.
With Google Public DNS, you do the same thing except you use these DNS Internet Protocol addresses: 8.8.8.8 and 8.8.4.4.
To use OpenDNS’ DNS service, you can set up a free Basic Account, but to just get the benefit of its DNS, all you need do is set up your local router and/or PCs to use 208.67.222.222 and 208.67.220.220 for their DNS settings.
How you do this depends on your network devices and your PCs’ operating systems. Here are the basics for the major desktop operating systems.
Setting Microsoft Windows 7 DNS Settings
1. Go the Control Panel.
2. Click Network and Internet, then Network and Sharing Center, and click Change adapter settings. 3. Select the connection for which you want to configure Google Public DNS. To change the settings for an Ethernet connection, right-click Local Area Connection, and click Properties. To change the settings for a wireless connection, right-click Wireless Network Connection, and click Properties. If you are prompted for an administrator password or confirmation, type the password or provide confirmation.
4. Select the Networking tab. Under This connection uses the following items, click Internet Protocol Version 4 (TCP/IPv4), and then click Properties.
5. Click Advanced and select the DNS tab. If there are any DNS server IP addresses listed there, write them down for future reference, and remove them from this window.
6. Click OK.
7. Replace any existing addresses with the IP addresses of the Google or OpenDNS DNS server addresses.
8. Restart the connection.
Setting Mac OS X DNS Settings
* 1. From the Apple menu, click System Preferences, then click Network.
2. If the lock icon in the lower left-hand corner of the window is locked, click the icon to make changes, and when prompted to authenticate, enter your password.
3. Select the connection for which you want to configure DNS. To change the settings for an Ethernet connection, select Built-In Ethernet, and click Advanced. To change the settings for a wireless connection, select Airport, and click Advanced.
4. Select the DNS tab.
5. Click + to replace any listed addresses with, or add, IP addresses of the Google or OpenDNS DNS servers.
6. Click Apply and OK.
Setting Ubuntu Linux DNS Settings
* In many modern Linux distributions, DNS settings are configured through Network Manager.
1. In the System menu, click Preferences, then click Network Connections.
2. Select the connection for which you want to configure DNS. For example: To change the settings for an Ethernet connection, select the Wired tab, then select your network interface in the list. It’s probably called eth0. To change the settings for a wireless connection, select the Wireless tab, then pick your wireless connection.
3. Click Edit, and in the window that appears, select the IPv4 Settings tab.
4. If the selected method is Automatic (DHCP), open the drop-down menu and select Automatic (DHCP) addresses only instead. If the method is set to something else, do not change it.
5. In the DNS servers field, enter the addresses of the Google or OpenDNS DNS servers.
6. Click Apply to save the change. If you are prompted for a password or confirmation, type the password or provide confirmation.
Personally, I prefer to use DNS addresses from both OpenDNS and Google.
On Android phones and tablets, there are set DNS apps
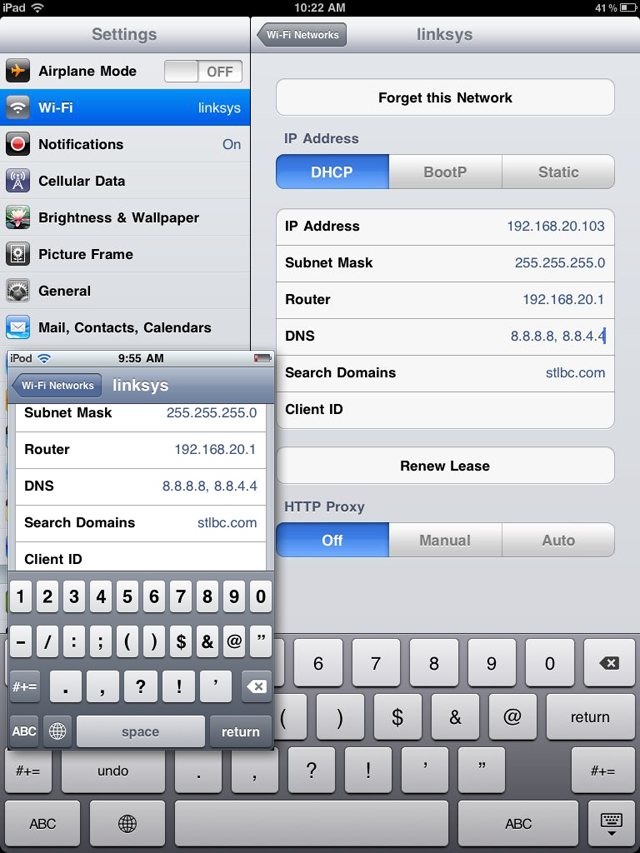
IPhone
Instructions for setting DNS on iphone, ipod touch and ipad

Here’s the addresses you should use for these:
Service:  OpenDNS  Google Public DNS  Norton DNS  Comodo DNS
Primary IP:  208.67.222.222  8.8.8.8  198.153.192.1  156.154.70.22
Secondary IP:  208.67.220.220  8.8.4.4  198.153.194.1  156.154.71.22
If you liked this article, please give it a quick review on ycombinator or StumbleUpon. Thanks

Brian Wang is a Futurist Thought Leader and a popular Science blogger with 1 million readers per month. His blog Nextbigfuture.com is ranked #1 Science News Blog. It covers many disruptive technology and trends including Space, Robotics, Artificial Intelligence, Medicine, Anti-aging Biotechnology, and Nanotechnology.
Known for identifying cutting edge technologies, he is currently a Co-Founder of a startup and fundraiser for high potential early-stage companies. He is the Head of Research for Allocations for deep technology investments and an Angel Investor at Space Angels.
A frequent speaker at corporations, he has been a TEDx speaker, a Singularity University speaker and guest at numerous interviews for radio and podcasts. He is open to public speaking and advising engagements.